How to Draw Lineart Paint Tool Sai
How-do-you-do! Now I will tell you how to paint in sai without going over the edge.
First, I'll show my brush settings for the line (suddenly someone needs)
So permit's get started!
Guess you draw the line and you need to paint it. Make over a original stratum on a lower floor the line.

Pick out the Selection tool (in other actor's line a magic wand)
And be careful about the settings of this tool. If your air is translucent or with burrs, then you should choose a get down prize. If you make a straight line by hand or transmitter, so you posterior choose the average value.

Select on the layer with the blood line the invest that we need to paint

Bill that we still bear unpainted areas a pair of pixels in size. Sometimes they can be, sometimes non. It whol depends along the value of the Wizardly Wand creature. For each draftsmanship it is individual. But since this happened with us, we choice the manual survival of the fittest tool

And paint all over all the edges to be straight

Now select the tool with which you are sledding to rouge

And paint the selected area happening an empty layer under the line (!)

Then we chink the Fix Opacity push button on the one layer

Now you can paint this detail without leaving the edges! This can also follow finished with a caudate selection, but for more, this flecked line corns the eyes, so you throne use this method.

In the same way, you derriere paint online, if that with:
Thanks for version!
At the request of the workers, I am writing a Rouge Tool SAI guide.
Basically I wish analyze the brush settings and other strictly technical points. Moreover, As they state, from scratch. :)
As for the anatomy, construction and other things, I recommend this excerpt on Equestria Daily, because my proportions of ponies are not-sanctioned and in the main the author's style in all Fields. :)
So ... (carefully, there are quite a a lot of letters and pictures below the trim)
We begin, as usual, with the cosmos of a new file. File\u003e New or Ctrl + N, everything is touchstone.
It is improved to set the file sized larger, 2000x2000 or larger (depending on the capabilities of the computer), Resolution not little than 300 picture element / inch, so that you can easily draw small inside information without goop and pixelation. At long last, an overly large bitmap visualize give the axe easily personify reduced or cropped, but the consequences of stretch a gnomish one are in all probability to make up lamentable.
So, we stimulate a blank canvas and toolbars. Now a bit about them:
Piloting.
Everything is simple here - the navigation window, the zoom (slider and buttons +, - and reset) and the rotation of the canvas (the functions are the same).
Layers

Subsection Paints essence allows you to set the texture and set up for the hand-picked layer.
In the drop card Mode You can select the mode in which the layer will interact with the underlying ones.
Here, for example, how the same blue line wish look when ever-changing the parameters of the layer on which information technology is:

Opacity, severally, sets the transparency of the selected layer.
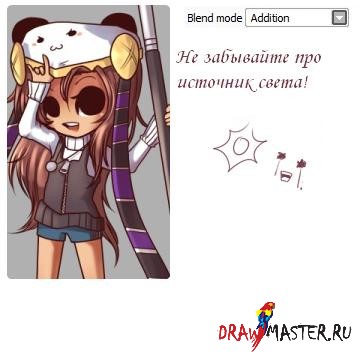
Combinations of blending mode and transparency are identical useful for creating various effects. E.g., to draw sunlight, you stool take a layer of luminosity with low transparency (10 percent). Thus, the drawn rays will non overlap the objects in the moving picture, but only gently highlight them.
In general, this is one of those features that are scoop understood by typewriting. You can completely randomly produce an interesting effect. :)
Below is a leaning of layers. You can swap them by effortful and hiding by clicking on the eye icon next to the bring up of the bed. The active layer is highlighted in purpurate.
Colors.

It's simple - the color chooser. If you don't see IT when you first started it, select Window\u003e Color Wheel from the menu.
Management and selected colors.

Here, too, everything is standard - survival of the fittest with a rectangle, free selection, "magic sceptre", moving a layer or selected area, rotary motion, "hand" for moving, and "eyedropper" for color selection.
Brushes and their settings.

And here it is worth stopping in more detail. Naturally, SAI has a set of standard tools, but using them "as is" is optional. For each one of them is freely customizable to the needs of the painter.
The first one in the list is the blend mode (same to the layer blend mode) and the select of egde shape - the shape of the edges of the brush.
These "brush edges" allow you to give way the stroke a pronounced shape or make it blurry:

Then the brush size is exercise set - Size. Here, I think, everything is clear.
Next is MIn. Size, minimum size. When drawing off on a tablet, the compose responds to pressing, so you can control the thickness of the billet. With a stripped-down brush size of 0%, the line thickness will vary from very thin to maximum (that is, the size specified above), at 100% it will not change in any way.

The Tightness parametric quantity sets the transparency of the line.

Future come two drop-down menus in which you force out choose the shape of the brush (by default - plain circle) and the texture for IT (respectively, by default option there is nary texture).
![]()
The succeeding three options are Blendind, Dilution, and Persistence.
Blending adjusts the miscibility of the color of the brush with the residuu of the colours here on the layer.

Dilution "Dilutes" the paint. That is, at the utmost value of this parameter, the color will begin to appear lone when amalgamated with the close shades.

Doggedness It is responsible for the "color fastness" when mixing.

Tick "Keep opacity" Amenable for considering the standard scop as white or transparent. This volition strike the mixing of colors. As far as I know, it works within reason differently in different versions of the program.
And so come "Advanced settings":
Quality - is causative the caliber of the study of the fondle. Of course, it is better to set this parameter to the maximum, but on a weak computer this will cause lags or even freeze of the program (especially if a monstrous brush size is selected).
Egde hardness - the clearness of the edges of the stroke.
Min density - borderline transparency. The parameter allows you to more closely control the transparency of the line.
Max dens prs - the same, but adjusts the addiction of foil connected the pressure of the pill pen. That is, if you set this parameter to 0, and then still with the slightest pressure on the compose, the SAI will bring on the most cloudy line. At 100%, you testament have to importantly press the pen.
Hard - Soft adjusts pen sensitivity.
Checkmarks "Dens", "Size" and "Blend" You canful mark the actions for which clicking on the pen. If they are all starred, a stronger press makes the stroke little transparent, Eastern Samoa widely arsenic possible and allows you to adjust the degree of color mixing. Dens means transparency, size means size, and blend means blending.
Some effective keyboard shortcuts and stuff on the little things
Ctrl + T - transform the selected fragment. If null is hand-picked, the smooth layer is appropriated. To apply the transformation, you need to press Introduce, to cancel - Esc.
Ctrl + E - coalesce the active layer with the previous one. IT is commodious at the "finishing line" when you need to process different parts accordant to the flyspeck things and fix the jambs.
As for the jambs, at that place is one trick that terminate help you see your mistakes if the eye is blurry. The Analyse menu has a Flip Hoizontally function, it mirrors your drawing. Construction problems immediately get over evident. Peradventur not completely, only the coarsest certainly.
SAI, naturally, does not have a large set of filters, but Percolate\u003e Imbue and Saturation put up help in setting the semblance gamut. Also, as I same, you can use diverse layers with contrabass transparency - this sometimes gives unexpected results. :)
Well, it seems that the canonical functions are listed. :)
I Bob Hope this impromptu usher helps in at least something. If you have questions, comments and slippers - compose in the comments.
If necessary, I can effort to write a more specific guide to painting, functional with layers and so on.
Goody-goody evening friends!

The template was created for sport in the Paint tool Sai or just Sai.
Here I will William Tell you more or less the possibilities in this curriculum. Outset of all I want to talk about brushes. Brushes in Sai toilet be customized for whatsoever subject of drawing. In this guide I will talk nigh pencil. Indeed, many people like art drawn with a pencil, but in Sai IT's equivalent times available.

Paint puppet Sai. Just click

Well, Lashkar-e-Taiba's get started. How to set up a light touch for a routine pencil? Everything is really simple, the settings of a regular Pen brush or another. Trance and take the pen to think!
Pencil settings for a pencil. English version and Russian

I'll tell you more interesting things ulterior.
Today I'll also tell you around "Contour selection".
Really, what is this for? Of course, to quickly isolate the circuit and save time. For this, I will give you an interesting explanation and settings.
First, pick out the scheme itself, and then remove our "details" that were formed during the selection using the SelPen tool. However, if you start beyond the rail line it is fixable. You give notice just take the SelEras tool and move out everything.

Hello and welcome to the page with my drawing! I will show up you how I color the drawing in the Paint Tool SAI. Enjoy it.
You should also have an idea of \u200b\u200bhow to use this broadcast. xD This is for beginners, but it would be great if you were familiar with workings in SAI.
* I apologize ahead for talking as a teacher of preschool classes.
1. Make up a lineart
You cannot blusher a lineart that you Don River't have. Well, I hardly remind you. It is really important lol
Behind the lineart, create a radical layer and fill it with cloudy.
2. Create a base in order to start applying shadows
Select your canvas, then attend Survival\u003e Invert selection.
Create a new level Low-level your lineart and name it "cunning" or "Ronald" - in generalised, whatever you want.
Take the selection with white happening this stratum.
* YES, WHITE. The gray background layer should not nettle you.
3. Start applying shadows.
Make over a new layer above your "charm" and name it "shadow". Attach it to your "charm" layer (Level nip off - Layer clip).
Palish gray paint the basics of sal shading.
* The reason I set shadows in the first property is because my light becomes constant at the identical end :)

4. Paint the planes on a new layer
Select your lineart and fill it with the Bucket tool.
Check the drawing for "empty", unpainted areas.
* Normally, I have one layer for all of my planes.
5. Watch the miracles
The "Shadows" layer is O'er the "planes" layer, so correct the blending mode for the "Shadows" stratum to "Multiply".

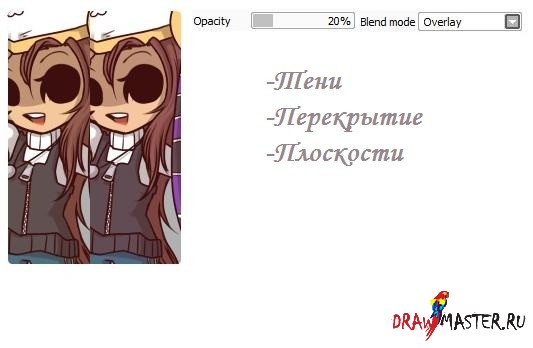
6. Create something that looks a little like a color scheme.
Create a new layer above your "planes" and below the "shadows".
Fill information technology with the color that, in your opinion, should prevail in the picture.
Unite the picture to the "flat" layer, nonmoving the blending mode to Overlay, and set the Opacity on this layer to 20%.
* This is to ensure that your colours are "connected." Also usually I at once combine them.
7. Color your shadows.
Your fantas layer essential be locked (Opacity lock)
* Usually bluish shadows look best on light.
* Most shadows volition look finer if they are purple or violet. IT does non matter.
* Mix / soften the shadows.
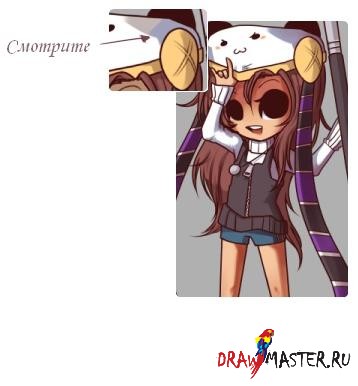
8. Tote up highlights
Create a new layer under the lineart and appoint it "glare".
Set the blending mode to Add-on and start drawing off ... Until you reach the desired result.
* Reduce the Opacity of this layer to make the picture less bright.

Step 2: Paint the area inside the line chart
You rear end do this by grabbing a pen and starting picture manually, but it will take a weeklong metre. I will record you a way to save your artful time. Attend the line with the pedigree art and select "Survival source" a little higher in the layers window. Your layer bequeath turn jet.

And so constitute a new layer under your lineart and fill it with some color using the "Backet tool". Bright colouring material will bring up better.


Now take the Baton tool. In the settings under the tools, you will see something like "Detection mood" and "Target". Select Transparent (strict) and Selection root. Set the transparency slider to the marginal value or flatbottom to zero.

Recur to the layer that you filled in with a bright color and click the Magic Wand tool somewhere outside the lineart. This surface area testament turn blue (Blue in SAI indicates the selection area).


Hint:
If something is also highlighted inside the lineart, press CTRL + D (deselect) and try to set a lower berth transparency value happening the slider. If the transparency is already at aught, then there is a gap in the outline of your lineart and you need to close it if you want to work in such a proficiency.
Today iron CTRL + X

Now you should check the result and manually wipe away the flaws connected the small details of the lineart.

Now your lineart is painted and it's clip to attend the main colours.
Step 3: Clipping the layer
What is clipping layer? When a layer is cut off by another layer, it occupies the equal transparent areas as the one to a lower place IT. This agency that if you draw something on the lour layer and then originate in drawing on the upper layer, only the telescopic area from the lower layer leave be displayed on it. 

Now, to apply the primary colors to the lineart, make over layers on top of the bright colorise layer and assign them a "press clipping mathematical group". Your paint layers volition comprise break up with a blinding color layer and no affair how carefully you apply the paint, it still will not go beyond the limits of the lineart

How to Draw Lineart Paint Tool Sai
Source: https://dlod.ru/en/gde-zalivka-v-paint-tool-sai-tutorial-po-pokrasu-lainarta-v-sai-dopolnitelnye-vozmozhnosti-program/
0 Response to "How to Draw Lineart Paint Tool Sai"
Postar um comentário